Add Increments as parallel branches: Level-7, A-JavaDoc
Add Increment: A-Jar
tP:
Brainstorm user stories before next lecture
iP
1 Add Increment as PR: Level-6
Create a new branch branch-Level-6.
Implement the increment in the new branch.
Push the branch to your fork.
Create a PR in your fork, from the new branch to the master branch. Steps for creating a PR is given in this textbook topic (steps 5 onwards):
Textbook Git & GitHub → Creating PRs
Suppose you want to propose some changes to a GitHub repo (e.g., samplerepo-pr-practice) as a pull request (PR). Here is a scenario you can try in order to learn how to create PRs:
Project Management → Revision Control → Remote Repositories →
A pull request (PR for short) is a mechanism for contributing code to a remote repo, i.e., "I'm requesting you to pull my proposed changes to your repo". For this to work, the two repos must have a shared history. The most common case is sending PRs from a fork to its upstream repo is a repo you forked fromupstream repo.
1. Fork the repo onto your GitHub account.
2. Clone it onto your computer.
3. Commit your changes e.g., add a new file with some contents and commit it.
Option A - Commit changes to the master branch
Option B - Commit to a new branch e.g., create a branch named add-intro (remember to switch to the master branch before creating a new branch) and add your commit to it.
4. Push the branch you updated (i.e., master branch or the new branch) to your fork, as explained here.
Git & GitHub → Branch →
Pushing a branch to a remote repo
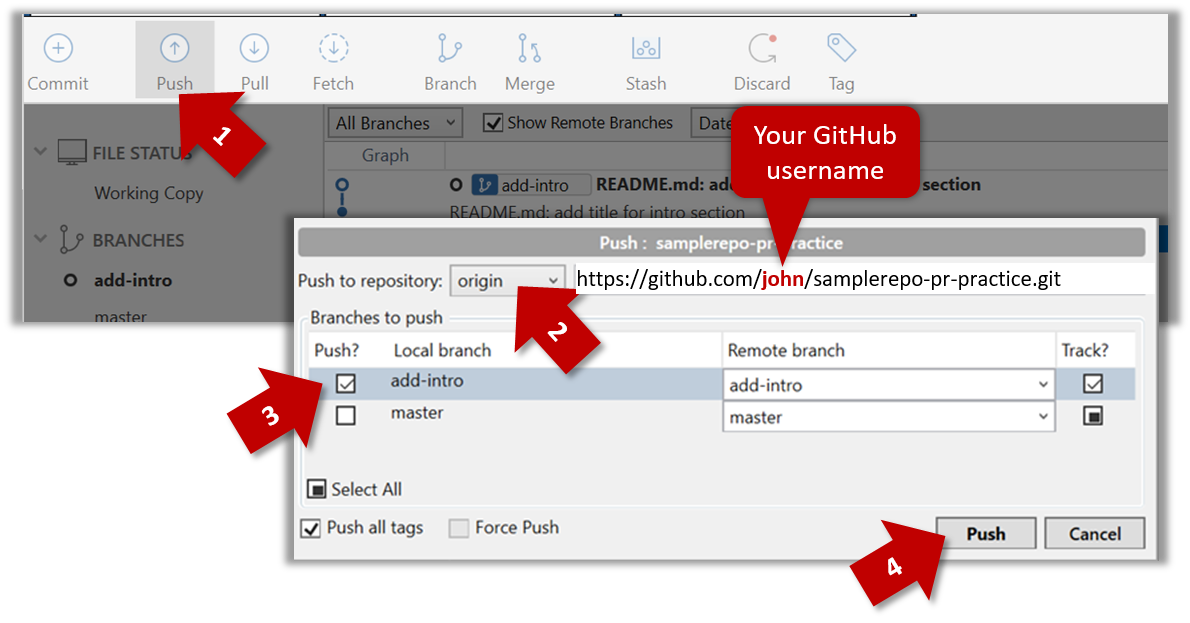
Here's how to push a branch to a remote repo:
SourceTree
Here's how to push a branch named add-intro to your own fork of a repo named samplerepo-pr-practice:
git push origin master pushes the master branch to the repo named origin (i.e., the repo you cloned from)
git push upstream-repo add-intro pushes the add-intro branch to the repo named upstream-repo
If pushing a branch you created locally to the remote for the first time, add the -u flag to get the local branch to track the new upstream branch:
e.g., git push -u origin add-intro
Click on the Pull requests tab followed by the New pull requestbutton. This will bring you to the 'Comparing changes' page.
Set the appropriate target repo and the branch that should receive your PR, using the base repository and base dropdowns. e.g., base repository: se-edu/samplerepo-pr-practicebase: master
Normally, the default value shown in the dropdown is what you want but in case your fork has e.g., the repo you forked from is also a fork of a another repo, which means both of those are considered upstream repos of your forkmultiple upstream repos, the default may not be what you want.
Indicate which repo:branch contains your proposed code, using the head repository and compare dropdowns. e.g., head repository: myrepo/samplerepo-pr-practicecompare: master
6. Verify the proposed code: Verify that the diff view in the page shows the exact change you intend to propose. If it doesn't, commit the new code and push to the branchupdate the branch as necessary.
7. Submit the PR:
Click the Create pull request button.
Fill in the PR name and description e.g.,
Name: Add an introduction to the README.md
Description:
Add some paragraph to the README.md to explain ...
Also add a heading ...
If you want to indicate that the PR you are about to create is 'still work in progress, not yet ready', click on the dropdown arrow in the Create pull request button and choose Create draft pull request option.
Click the Create pull request button to create the PR.
Go to the receiving repo to verify that your PR appears there in the Pull requests tab.
The next step of the PR life cycle is the PR review. The members of the repo that received your PR can now review your proposed changes.
If they like the changes, they can merge the changes to their repo, which also closes the PR automatically.
If they don't like it at all, they can simply close the PR too i.e., they reject your proposed change.
In most cases, they will add comments to the PR to suggest further changes. When that happens, GitHub will notify you.
You can update the PR along the way too. Suppose PR reviewers suggested a certain improvement to your proposed code. To update your PR as per the suggestion, you can simply modify the code in your local repo, commit the updated code to the same master branch, and push to your fork as you did earlier. The PR will auto-update accordingly.
Sending PRs using the master branch is less common than sending PRs using separate branches. For example, suppose you wanted to propose two bug fixes that are not related to each other. In that case, it is more appropriate to send two separate PRs so that each fix can be reviewed, refined, and merged independently. But if you send PRs using the master branch only, both fixes (and any other change you do in the master branch) will appear in the PRs you create from it.
To create another PR while the current PR is still under review, create a new branch (remember to switch back to the master branch first), add your new proposed change in that branch, and create a new PR following the steps given above.
It is possible to create PRs within the same repo e.g., you can create a PR from branch feature-x to the master branch, within the same repo. Doing so will allow the code to be reviewed by other developers (using PR review mechanism) before it is merged.
Create a new branch e.g., (feature1) and add some commits to it.
Push the new branch to the fork.
Create a PR from that branch to the master branch in your fork. Yes, it is possible to create a PR within the same repo.
1. Locate the PR to be merged in your repo's GitHub page.
2. Click on the Conversation tab and scroll to the bottom. You'll see a panel containing the PR status summary.
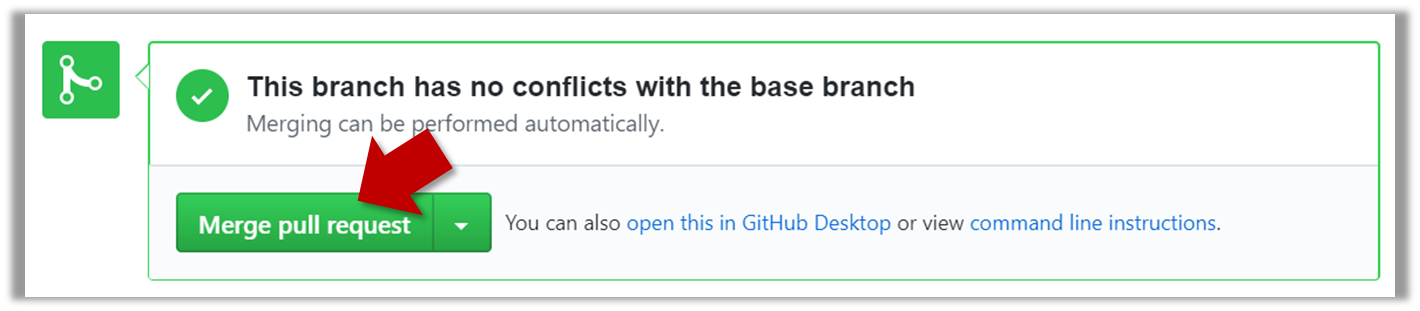
3. If the PR is not merge-able in the current state, the Merge pull request will not be green. Here are the possible reasons and remedies:
Problem: The PR code is out-of-date, indicated by the message This branch is out-of-date with the base branch. That means the repo's master branch has been updated since the PR code was last updated.
If the PR author has allowed you to update the PR and you have sufficient permissions, GitHub will allow you to update the PR simply by clicking the Update branch on the right side of the 'out-of-date' error message.
If that option is not available, post a message in the PR requesting the PR author to update the PR.
Problem: There are merge conflicts, indicated by the message This branch has conflicts that must be resolved. That means the repo's master branch has been updated since the PR code was last updated, in a way that the PR code conflicts with the current master branch. Those conflicts must be resolved before the PR can be merged.
If the conflicts are simple, GitHub might allow you to resolve them using the Web interface.
If that option is not available, post a message in the PR requesting the PR author to update the PR.
Tools → Git & GitHub → Merge Conflicts
Tools → Git and GitHub →
Dealing with merge conflicts
Merge conflicts happen when you try to combine two incompatible versions (e.g., merging a branch to another but each branch changed the same part of the code in a different way).
Here are the steps to simulate a merge conflict and use it to learn how to resolve merge conflicts.
0. Create an empty repo or clone an existing repo, to be used for this activity.
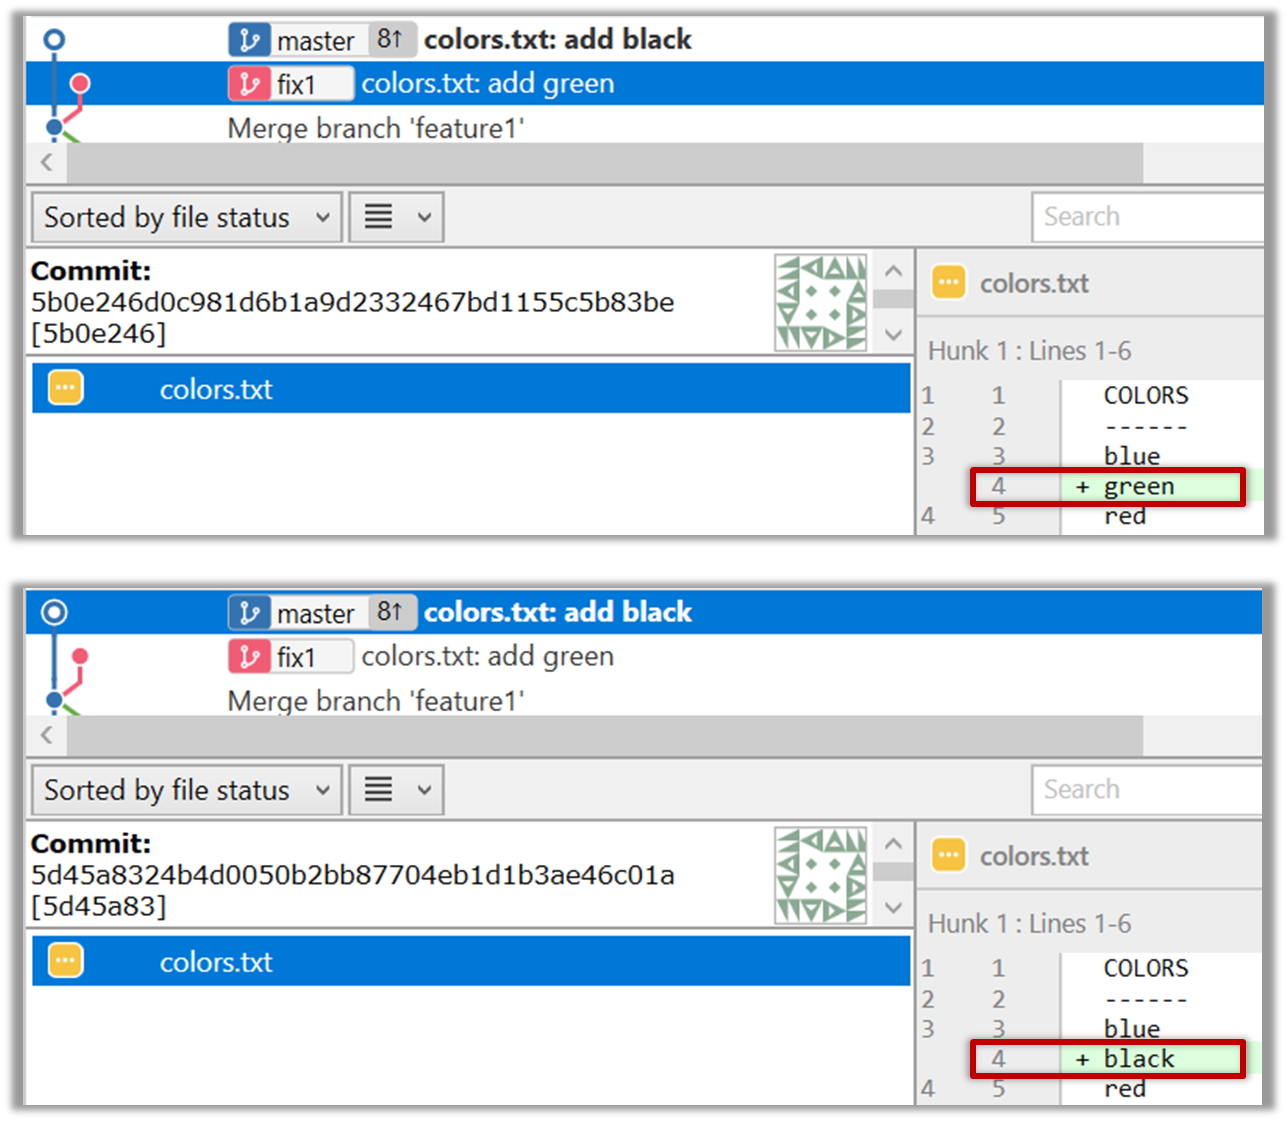
1. Start a branch named fix1 in the repo. Create a commit that adds a line with some text to one of the files.
2. Switch back to master branch. Create a commit with a conflicting change i.e. it adds a line with some different text in the exact location the previous line was added.
3. Try to merge the fix1 branch onto the master branch. Git will pause mid-way during the merge and report a merge conflict. If you open the conflicted file, you will see something like this:
COLORS
------
blue
<<<<<< HEAD
black
=======
green
>>>>>> fix1
red
white
4. Observe how the conflicted part is marked between a line starting with <<<<<< and a line starting with >>>>>>, separated by another line starting with =======.
Highlighted below is the conflicting part that is coming from the master branch:
blue
<<<<<< HEAD
black
=======
green
>>>>>> fix1
red
This is the conflicting part that is coming from the fix1 branch:
blue
<<<<<< HEAD
black
=======
green
>>>>>> fix1
red
5. Resolve the conflict by editing the file. Let us assume you want to keep both lines in the merged version. You can modify the file to be like this:
COLORS
------
blue
black
green
red
white
6. Stage the changes, and commit.
3. Merge the PR by clicking on the Merge pull request button, followed by the Confirm merge button. You should see a Pull request successfully merged and closed message after the PR is merged.
You can choose between three merging options by clicking on the down-arrow in the Merge pull request button. If you are new to Git and GitHub, the Create merge commit options are recommended.
Next, sync your local repos (and forks). Merging a PR simply merges the code in the upstream remote repository in which it was merged. The PR author (and other members of the repo) needs to pull the merged code from the upstream repo to their local repos and push the new code to their respective forks to sync the fork with the upstream repo.
Pull the master branch from the fork to your local repo.
DukeLevel-6: Delete
Level 6. Delete
Add support for deleting tasks from the list.
Example:
list
    ____________________________________________________________
     Here are the tasks in your list:
     1.[T][✓] read book
     2.[D][✓] return book (by: June 6th)
     3.[E][✗] project meeting (at: Aug 6th 2-4pm)
     4.[T][✓] join sports club
     5.[T][✗] borrow book
    ____________________________________________________________

delete 3
    ____________________________________________________________
     Noted. I've removed this task:
       [E][✗] project meeting (at: Aug 6th 2-4pm)
     Now you have 4 tasks in the list.
    ____________________________________________________________
When implementing this feature, you are also recommended to implement the following extension:
Extension: A-Collections
A-Collections
↳ Use Java Collections classes
Use Java Collections classes for storing data. For example, you can use an ArrayList<Task> to store the tasks.
2 Add Increments as parallel branches: Level-7, A-JavaDoc
Do Level 7 in a branch named branch-Level-7. Without merging that branch, go back to the master branch and implement the other increment in a separate branch named similar to the first (i.e., branch-{increment ID}). Now, go back to the master branch and merge the two branches one after the other. As before, tag the commit (in the master branch, after merging) that achieves the respective deliverable, and push to your fork.
Remember to push the branches to your fork so that the bot can detect them.
Only merged branches are detected by the script. After merging a branch b1 to the master branch, you need to push both the master and the b1 branches to the fork. Pushing the master branch does not automatically take the b1 branch along with it just because it is already merged to the master branch.
Advanced git users: do not delete the branch after merging. Merge without a fast-forward so that git creates a separate commit for the merge.
DukeLevel-7: Save
Level 7. Save
Save the tasks in the hard disk automatically whenever the task list changes. Load the data from the hard disk when Duke starts up. You may hard-code the file name and location e.g., [project_root]/data/duke.txt
The format of the file is up to you. Example:
T | 1 | read book
D | 0 | return book | June 6th
E | 0 | project meeting | Aug 6th 2-4pm
T | 1 | join sports club
If you use file paths in your code,
remember to use relative paths rather than absolute paths such as C:\data. If not, your app can cause unpredictable results when used in another computer.
Your code must i.e., if the file is missing, your code must creat ithandle the case where the data file doesn't exist at the start. Reason: when someone else takes your Duke and runs it for the first time, the required file might not exist in their computer. Similarly, if you expect the data file to be in as specific folder (e.g., ./data/), you must also handle the folder-does-not-exist-yet case.
DukeA-JavaDoc: JavaDoc
A-JavaDoc
↳ Add JavaDoc comments
Add JavaDoc comments to the code.
Minimal: Add header comments to at least half of the non-private classes/methods.
Stretch goal: Add header comments to all non-private classes/methods, and non-trivial private methods.
3 Add Increment: A-Jar
In case this increment does not require any code changes, you may tag the commit at which this was achieved as A-Jar (even if that commit has another tag already).
Upload the jar file to your fork as explained in the panel below.
DukeA-Jar: Create a JAR File
A-Jar
↳ Package the App as a JAR file
Package the app as an executable JAR file so that it can be distributed easily.
You can assume the user will run the jar file in the following way only:
Copy the jar file into an empty folder
Open a command window in that folder
Run the command java -jar {filename}.jar e.g., java -jar Duke.jar (i.e., run the command in the same folder as the jar file)
Follow the steps in the recipe mentioned above to arrive at user stories for the the product, with your team members.
How many user stories? Aim to collect more user stories than you can deliver in the project. Aim to create at least 30 user stories. Include all 'obvious' ones you can think of but also look for 'non obvious' ones that you think are likely to be missed by other competing products.
User stories of what size? Normally, it is fine to use epic-level user stories in the early stages of a project but given this is a small project, you may want to define smaller user stories (i.e., small enough for one person to implement in 1-2 days).
Bad As a user, I can track my schedule, so that I can know when to do things. Reason: too big, as track can involve a lot of things.
Good As a user, I can add a time to a task, so that I can record when a task need to be done.
Good As a user, I can see the pending task that has the next earliest deadline, so that I can know what I need to do next.
What format?: You may use a sentence format or a table format but do maintain the prescribed three-part structure of a user story. In particular, try to include the benefit part in most user stories as that will come in handy when prioritizing user stories later.
How to record?
Keep records of intermediate steps (e.g., persona, scenarios) in your collaborative project document started in the previous week.
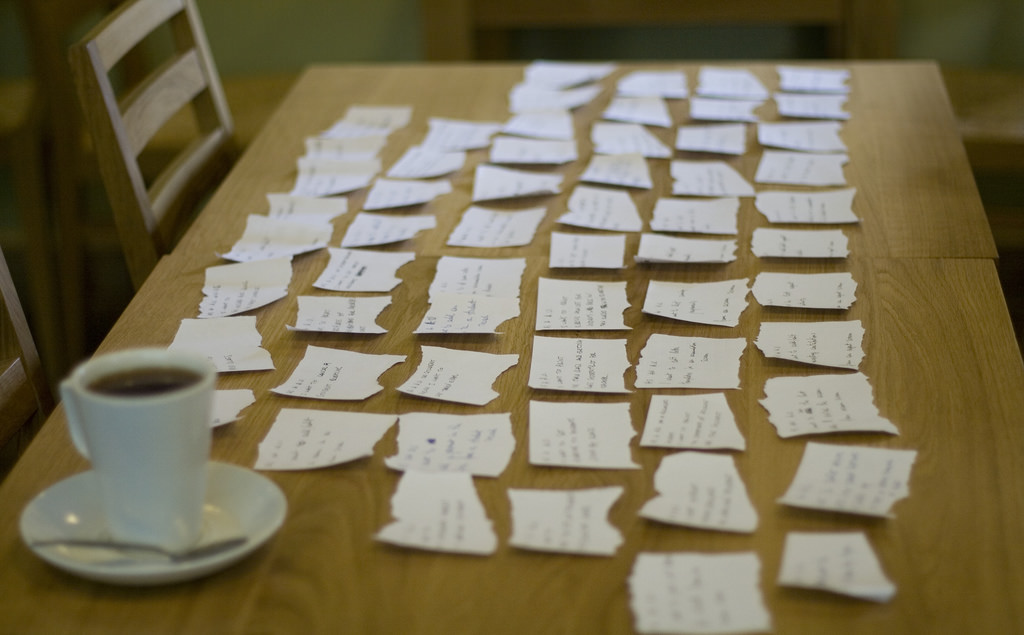
You can write each user story in a piece of paper (e.g. yellow sticky note, index card, or just pieces of paper about the size of a playing card). Alternatively you can use an online tool (some examples given in [Textbook Specifying Requirements → UserStories → Usage → (panel) Tool Examples ]).
Textbook
Requirements → Gathering Requirements →
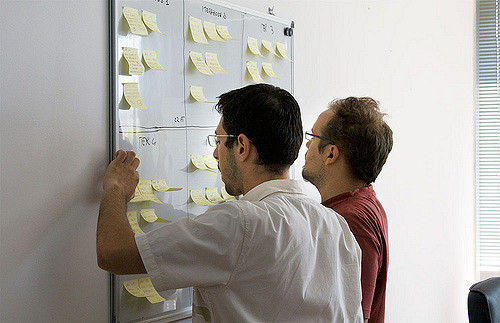
Brainstorming
Brainstorming: A group activity designed to generate a large number of diverse and creative ideas for the solution of a problem.
In a brainstorming session there are no "bad" ideas. The aim is to generate ideas; not to validate them. Brainstorming encourages you to "think outside the box" and put "crazy" ideas on the table without fear of rejection.
Exercises
Characteristic of brainstorming
What is the key characteristic about brainstorming?
(b)
Textbook
Requirements → Specifying Requirements →
User stories
Introduction
Can write simple user stories
User story: User stories are short, simple descriptions of a feature told from the perspective of the person who desires the new capability, usually a user or customer of the system. [Mike Cohn]
A common format for writing user stories is:
User story format: As a {user type/role} I can {function} so that {benefit}
Examples (from a Learning Management System):
As a student, I can download files uploaded by lecturers, so that I can get my own copy of the files
As a lecturer, I can create discussion forums, so that students can discuss things online
As a tutor, I can print attendance sheets, so that I can take attendance during the class
You can write user stories on index cards or sticky notes, and arrange them on walls or tables, to facilitate planning and discussion. Alternatively, you can use a software (e.g., GitHub Project Boards, Trello, Google Docs, ...) to manage user stories digitally.
a. They are based on stories users tell about similar systems
b. They are written from the user/customer perspective
c. They are always written in some physical medium such as index cards or sticky notes
a. Reason: Despite the name, user stories are not related to 'stories' about the software.
b.
c. Reason: It is possible to use software to record user stories. When the team members are not co-located this may be the only option.
What's wrong with this user story?
Critique the following user story taken from a software project to build an e-commerce website.
As a developer, I want to use Python to implement the software, so that we can reuse existing Python modules.
Refer to the definition of a user story.
User story: User stories are short, simple descriptions of a feature told from the perspective of the person who desires the new capability, usually a user or customer of the system. [Mike Cohn]
This user story is not written from the perspective of the user/customer.
Extract user stories from customer statement
Bill wants you to build a Human Resource Management (HRM) system. He mentions that the system will help employees to view their own The number of leave days not yet takenleave balance. What are the user stories you can extract from that statement?
Remember to follow the correct format when writing user stories.
User story format: As a {user type/role} I can {function} so that {benefit}
As an employee, I can view my leave balance, so that I can know how many leave days I have left.
Note: the {benefit} part may vary as it is not specifically mentioned in the question.
Details
Can write more detailed user stories
The {benefit} can be omitted if it is obvious.
As a user, I can login to the system so that I can access my data
It is recommended to confirm there is a concrete benefit even if you omit it from the user story. If not, you could end up adding features that have no real benefit.
You can add more characteristics to the {user role} to provide more context to the user story.
As a forgetful user, I can view a password hint, so that I can recall my password.
As an expert user, I can tweak the underlying formatting tags of the document, so that I can format the document exactly as I need.
You can write user stories at various levels. High-level user stories, called epics (or themes) cover bigger functionality. You can then break down these epics to multiple user stories of normal size.
[Epic] As a lecturer, I can monitor student participation levels
As a lecturer, I can view the forum post count of each student
so that I can identify the activity level of students in the forum
As a lecturer, I can view webcast view records of each student
so that I can identify the students who did not view webcasts
As a lecturer, I can view file download statistics of each student
so that I can identify the students who did not download lecture materials
You can add conditions of satisfaction to a user story to specify things that need to be true for the user story implementation to be accepted as ‘done’.
As a lecturer, I can view the forum post count of each student so that I can identify the activity level of students in the forum.
Conditions:
Separate post count for each forum should be shown
Total post count of a student should be shown
The list should be sortable by student name and post count
Other useful info that can be added to a user story includes (but not limited to)
Priority: how important the user story is
Size: the estimated effort to implement the user story
Urgency: how soon the feature is needed
More examples extra
User stories for a travel website (credit: Mike Cohen)
As a registered user, I am required to log in so that I can access the system
As a forgetful user, I can request a password reminder so that I can log in if I forget mine
[Epic] As a user, I can cancel a reservation
As a premium site member, I can cancel a reservation up to the last minute
As a non-premium member, I can cancel up to 24 hours in advance
As a member, I am emailed a confirmation of any cancelled reservation
[Epic] As a frequent flyer, I want to book a trip
As a frequent flyer, I want to book a trip using miles
As a frequent flyer, I want to rebook a trip I take often
As a frequent flyer, I want to request an upgrade
As a frequent flyer, I want to see if my upgrade cleared
Exercises
Correct statements about user stories
Choose the correct statements
a. User stories are short and written in a formal notation.
b. User stories is another name for use cases.
c. User stories describes past experiences users had with similar systems. These are helpful in developing the new system.
d. User stories are not detailed enough to tell us exact details of the product.
d
Explanation: User stories are short and written in natural language, NOT in a formal language. They are used for estimation and scheduling purposes but do not contain enough details to form a complete system specification.
Usage
Can use user stories to manage requirements of project
User stories capture user requirements in a way that is convenient for i.e. which features to include in the productscoping, i.e. how much effort each feature will takeestimation, and i.e. when to deliver each featurescheduling.
[User stories] strongly shift the focus from writing about features to discussing them. In fact, these discussions are more important than whatever text is written. [Mike Cohn, MountainGoat Software 🔗]
User stories differ from e.g. a description of the requirements written in prosetraditional requirements specifications mainly in the level of detail. User stories should only provide enough details to make a reasonably low risk estimate of how long the user story will take to implement. When the time comes to implement the user story, the developers will meet with the customer face-to-face to work out a more detailed description of the requirements. [more...]
User stories can capture non-functional requirements too because even NFRs must benefit some stakeholder.
Textbook
Requirements → Requirements →
Non-functional requirements
Requirements can be divided into two in the following way:
Functional requirements specify what the system should do.
Non-functional requirements specify the constraints under which the system is developed and operated.
Some examples of non-functional requirement categories:
Data requirements e.g. size, how often do data changevolatility, saving data permanentlypersistency etc.,
Environment requirements e.g. technical environment in which the system would operate in or needs to be compatible with.
Accessibility, Capacity, Compliance with regulations, Documentation, Disaster recovery, Efficiency, Extensibility, Fault tolerance, Interoperability, Maintainability, Privacy, Portability, Quality, Reliability, Response time, Robustness, Scalability, Security, Stability, Testability, and more ...
Some concrete examples of NFRs
Business/domain rules: e.g. the size of the minefield cannot be smaller than five.
Constraints: e.g. the system should be backward compatible with data produced by earlier versions of the system; system testers are available only during the last month of the project; the total project cost should not exceed $1.5 million.
Technical requirements: e.g. the system should work on both 32-bit and 64-bit environments.
Performance requirements: e.g. the system should respond within two seconds.
Quality requirements: e.g. the system should be usable by a novice who has never carried out an online purchase.
Process requirements: e.g. the project is expected to adhere to a schedule that delivers a feature set every one month.
Notes about project scope: e.g. the product is not required to handle the printing of reports.
Any other noteworthy points: e.g. the game should not use images deemed offensive to those injured in real mine clearing activities.
You may have to spend an extra effort in digging NFRs out as early as possible because,
NFRs are easier to misse.g., stakeholders tend to think of functional requirements first
sometimes NFRs are critical to the success of the software.E.g. A web application that is too slow or that has low security is unlikely to succeed even if it has all the right functionality.
Exercises
TEAMMATES NFRs
Given below are some requirements of TEAMMATES (an online peer evaluation system for education). Which one of these are non-functional requirements?
a. The response to any use action should become visible within 5 seconds.
b. The application admin should be able to view a log of user activities.
c. The source code should be open source.
d. A course should be able to have up to 2000 students.
e. As a student user, I can view details of my team members so that I can know who they are.
f. The user interface should be intuitive enough for users who are not IT-savvy.
g. The product is offered as a free online service.
(a)(c)(d)(f)(g)
Explanation: (b) are (e) are functions available for a specific user types. Therefore, they are functional requirements. (a), (c), (d), (f) and (g) are either constraints on functionality or constraints on how the project is done, both of which are considered non-functional requirements.
An example of an NFR captured as a user story:
As a
I want to
so that
impatient user
to be able experience reasonable response time from the website while up to 1000 concurrent users are using it
I can use the app even when the traffic is at the maximum expected level
Given their lightweight nature, user stories are quite handy for recording requirements during early stages of requirements gathering.
A recipe for brainstorming user stories
Given below is a possible recipe you can take when using user stories for early stages of requirement gathering.
Step 0:Clear your mind of preconceived product ideas
Even if you already have some idea of what your product will look/behave like in the end, clear your mind of those ideas. The product is the solution. At this point, we are still at the stage of figuring out the problem (i.e., user requirements). Let's try to get from the problem to the solution in a systematic way, one step at a time.
Step 1:Define the target user as a persona:
Decide your target user's profile (e.g. a student, office worker, programmer, salesperson) and work patterns (e.g. Does he work in groups or alone? Does he share his computer with others?). A clear understanding of the target user will help when deciding the importance of a user story. You can even narrow it down to a persona. Here is an example:
Jean is a university student studying in a non-IT field. She interacts with a lot of people due to her involvement in university clubs/societies. ...
Step 2:Define the problem scope:
Decide the exact problem you are going to solve for the target user. It is also useful to specify what related problems it will not solve so that the exact scope is clear.
ProductX helps Jean keep track of all her school contacts. It does not cover communicating with contacts.
Step 3:List scenarios to form a narrative:
Think of the various scenarios your target user is likely to go through as she uses your app. Following a chronological sequence as if you are telling a story might be helpful.
A. First use:
Jean gets to know about ProductX. She downloads it and launches it to check out what it can do.
After playing around with the product for a bit, Jean wants to start using it for real.
...
B. Second use: (Jean is still a beginner)
Jean launches ProductX. She wants to find ...
...
C. 10th use: (Jean is a little bit familiar with the app)
...
D. 100th use: (Jean is an expert user)
Jean launches the app and does ... and ... followed by ... as per her usual habit.
Jean feels some of the data in the app are no longer needed. She wants to get rid of them to reduce clutter.
More examples that might apply to some products:
Jean uses the app at the start of the day to ...
Jean uses the app before going to sleep to ...
Jean hasn't used the app for a while because she was on a three-month training programme. She is now back at work and wants to resume her daily use of the app.
Jean moves to another company. Some of her clients come with her but some don't.
Jean starts freelancing in her spare time. She wants to keep her freelancing clients separate from her other clients.
Step 4:List the user stories to support the scenarios:
Based on the scenarios, decide on the user stories you need to support. For example, based on the scenario 'A. First use', you might have user stories such as these:
As a potential user exploring the app, I can see the app populated with sample data, so that I can easily see how the app will look like when it is in use.
As a user ready to start using the app, I can purge all current data, so that I can get rid of sample/experimental data I used for exploring the app.
To give another example, based on the scenario 'D. 100th use', you might have user stories such as these:
As an expert user, I can create shortcuts for tasks, so that I can save time on frequently performed tasks.
As a long-time user, I can archive/hide unused data, so that I am not distracted by irrelevant data.
Do not 'evaluate' the value of user stories while brainstorming. Reason: an important aspect of brainstorming is not judging the ideas generated.
Other tips:
Don't be too hasty to discard 'unusual' user stories:
Those might make your product unique and stand out from the rest, at least for the target users.
Don't go into too much details:
For example, consider this user story: As a user, I want to see a list of tasks that needs my attention most at the present time, so that I pay attention to them first.
When discussing this user story, don't worry about what tasks should be considered needs my attention most at the present time. Those details can be worked out later.
Don't be biased by preconceived product ideas:
When you are at the stage of identifying user needs, clear your mind of ideas you have about what your end product will look like. That is, don't try to reverse-engineer a preconceived product idea into user stories.
Don't discuss implementation details or whether you are actually going to implement it:
When gathering requirements, your decision is whether the user's need is important enough for you to want to fulfil it. Implementation details can be discussed later. If a user story turns out to be too difficult to implement later, you can always omit it from the implementation plan.
While use cases can be recorded on e.g. index cards or sticky notesphysical paper in the initial stages, an online tool is more suitable for longer-term management of user stories, especially if the team is not physically in the same locationco-located.
Tool Examples: How to use some example online tools to manage user stories
tool examples
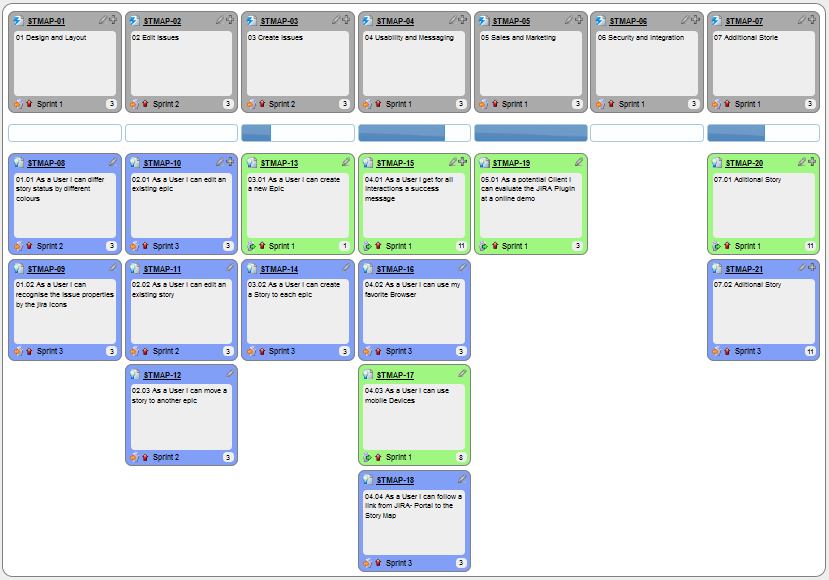
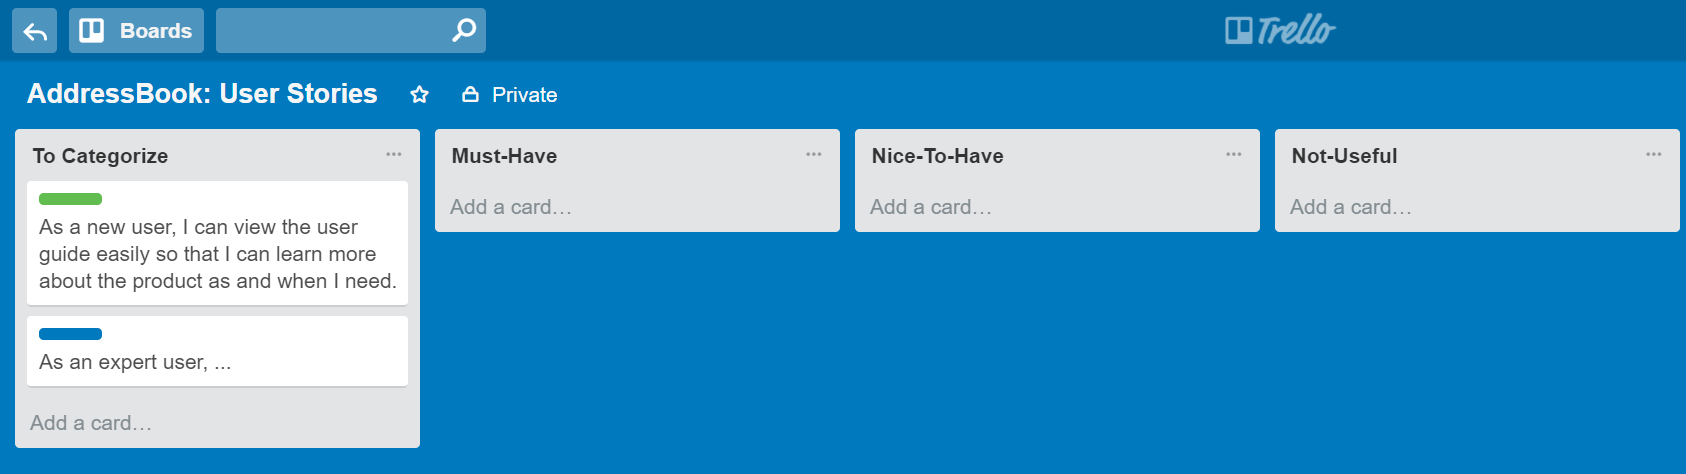
GitHub Project Boards
You can create issues for each of the user stories and use a GitHub Project Board to sort them into categories.
Example Project Board:
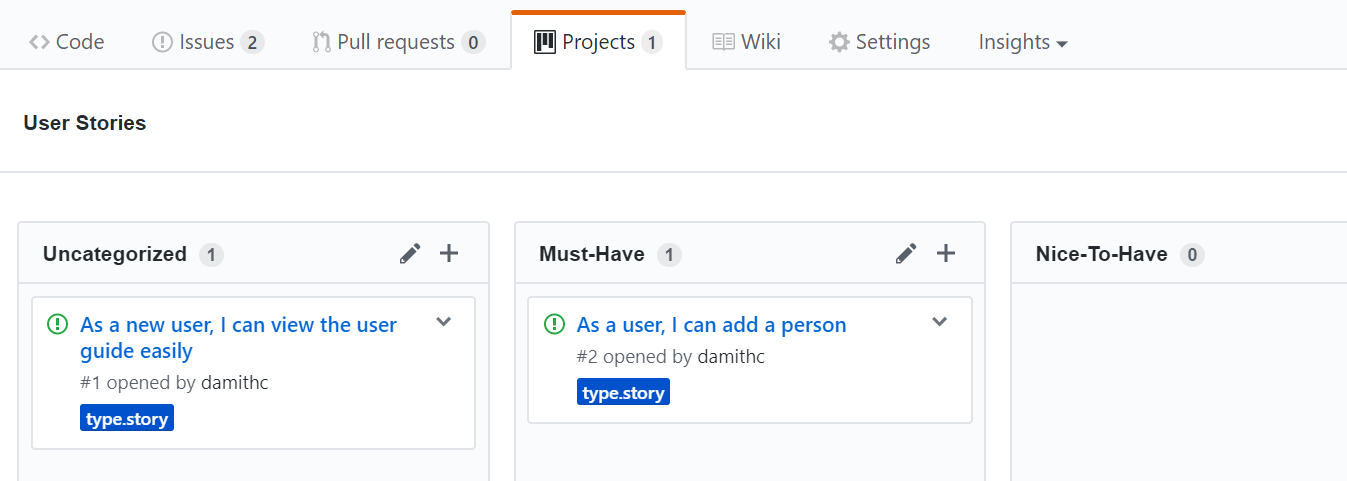
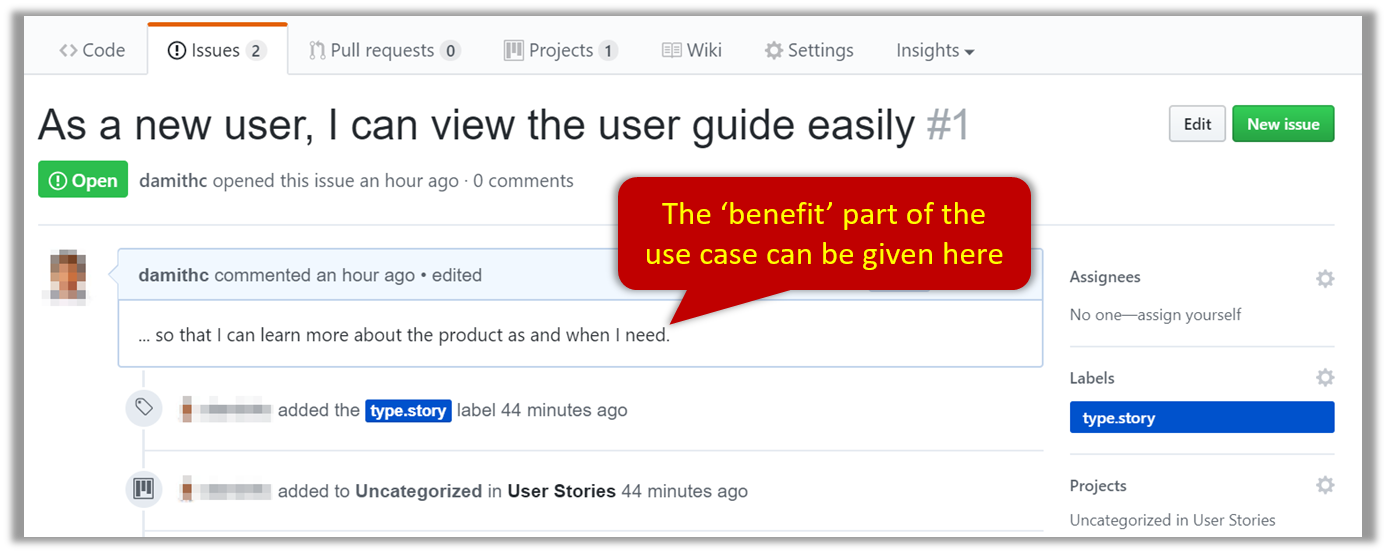
Example Issue to represent a user story:
You can break the user story into issue subject and description in this way:
title
As a user I can add a deadline
Description
... so that I can keep track of my deadlines
Alternatively, you can put the entire user story in the description.
title
Add deadline
Description
As a user I can so that I can keep track of my deadlines
🔖 User stories vs traditional requirement specifications, according to XP
eXtreme Programming (XP)eXtreme Programming (XP)
Extreme programming (XP) is a software development methodology which is intended to improve software quality and responsiveness to changing customer requirements. As a type of agile software development, it advocates frequent "releases" in short development cycles, which is intended to improve productivity and introduce checkpoints at which new customer requirements can be adopted. [wikipedia, 2017.05.01]
uses User stories to capture requirements.
This page in their website explains the difference between user stories and traditional requirements.
One of the biggest misunderstandings with user stories is how they differ from traditional requirements specifications. The biggest difference is in the level of detail. User stories should only provide enough detail to make a reasonably low risk estimate of how long the story will take to implement. When the time comes to implement the story developers will go to the customer and receive a detailed description of the requirements face to face.
Resources
This article by Mike Cohn from MountainGoatSoftware explains how to use user stories to capture NFRs.
