- Add Increment as PR:
Level-6 - Add Increments as parallel branches:
Level-7,A-JavaDoc - Add Increment:
A-Jar
1 Add Increment as PR: Level-6
- Create a new branch
branch-Level-6. - Implement the increment in the new branch.
- Push the branch to your fork.
- Create a PR in your fork, from the new branch to the
masterbranch. Steps for creating a PR is given in this textbook topic (steps 5 onwards):
Textbook Git & GitHub → Creating PRs
Suppose you want to propose some changes to a GitHub repo (e.g., samplerepo-pr-practice) as a pull request (PR). Here is a scenario you can try in order to learn how to create PRs:
A pull request (PR for short) is a mechanism for contributing code to a remote repo, i.e., "I'm requesting you to pull my proposed changes to your repo". For this to work, the two repos must have a shared history. The most common case is sending PRs from a fork to its upstream repo is a repo you forked fromupstream repo.
1. Fork the repo onto your GitHub account.
2. Clone it onto your computer.
3. Commit your changes e.g., add a new file with some contents and commit it.
- Option A - Commit changes to the
masterbranch - Option B - Commit to a new branch e.g., create a branch named
add-intro(remember to switch to themasterbranch before creating a new branch) and add your commit to it.
4. Push the branch you updated (i.e., master branch or the new branch) to your fork, as explained here.
Pushing a branch to a remote repo
Here's how to push a branch to a remote repo:
Here's how to push a branch named add-intro to your own fork of a repo named samplerepo-pr-practice:
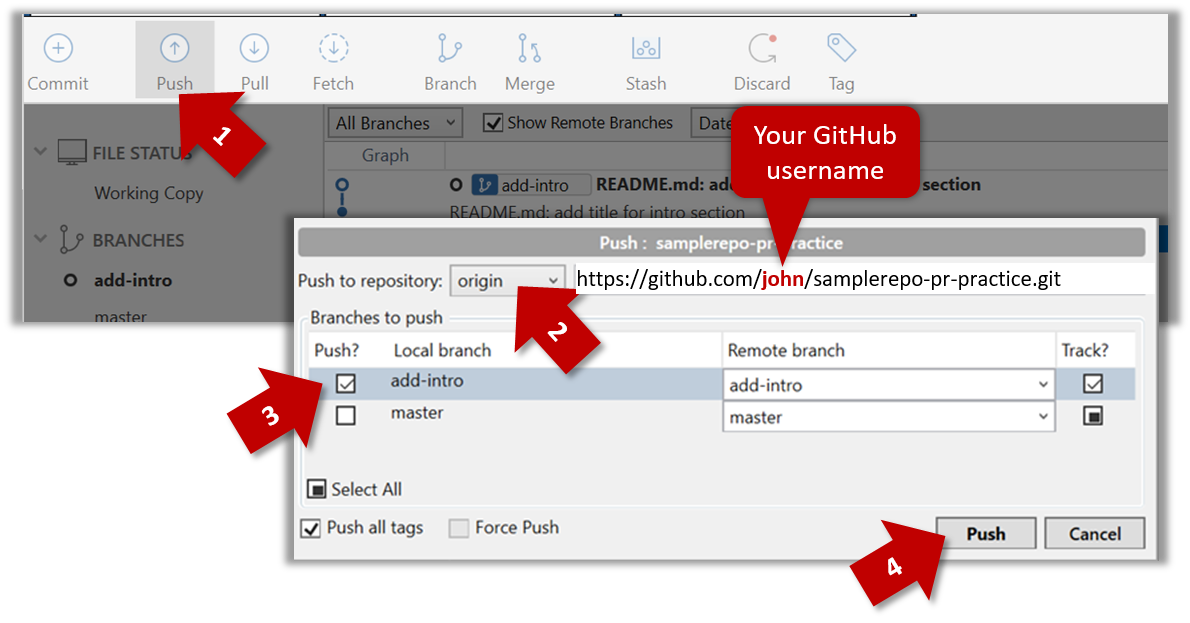
Normally: git push {remote repository} {branch}. Examples:
git push origin masterpushes themasterbranch to the repo namedorigin(i.e., the repo you cloned from)git push upstream-repo add-intropushes theadd-introbranch to the repo namedupstream-repo
If pushing a branch you created locally to the remote for the first time, add the -u flag to get the local branch to track the new upstream branch:
e.g., git push -u origin add-intro
See git-scm.com/docs/git-push for details of the push command.
5. Initiate the PR creation:
-
Go to your fork.
-
Click on the Pull requests tab followed by the New pull request button. This will bring you to the 'Comparing changes' page.
-
Set the appropriate target repo and the branch that should receive your PR, using the
base repositoryandbasedropdowns. e.g.,
base repository: se-edu/samplerepo-pr-practice base: masterNormally, the default value shown in the dropdown is what you want but in case your fork has e.g., the repo you forked from is also a fork of a another repo, which means both of those are considered upstream repos of your forkmultiple upstream repos, the default may not be what you want.
-
Indicate which repo:branch contains your proposed code, using the
head repositoryandcomparedropdowns. e.g.,
head repository: myrepo/samplerepo-pr-practice compare: master
6. Verify the proposed code: Verify that the diff view in the page shows the exact change you intend to propose. If it doesn't, commit the new code and push to the branchupdate the branch as necessary.
7. Submit the PR:
-
Click the Create pull request button.
-
Fill in the PR name and description e.g.,
Name:Add an introduction to the README.md
Description:Add some paragraph to the README.md to explain ...
Also add a heading ... -
If you want to indicate that the PR you are about to create is 'still work in progress, not yet ready', click on the dropdown arrow in the Create pull request button and choose
Create draft pull requestoption. -
Click the Create pull request button to create the PR.
-
Go to the receiving repo to verify that your PR appears there in the
Pull requeststab.
The next step of the PR life cycle is the PR review. The members of the repo that received your PR can now review your proposed changes.
- If they like the changes, they can merge the changes to their repo, which also closes the PR automatically.
- If they don't like it at all, they can simply close the PR too i.e., they reject your proposed change.
- In most cases, they will add comments to the PR to suggest further changes. When that happens, GitHub will notify you.
You can update the PR along the way too. Suppose PR reviewers suggested a certain improvement to your proposed code. To update your PR as per the suggestion, you can simply modify the code in your local repo, commit the updated code to the same master branch, and push to your fork as you did earlier. The PR will auto-update accordingly.
Sending PRs using the master branch is less common than sending PRs using separate branches. For example, suppose you wanted to propose two bug fixes that are not related to each other. In that case, it is more appropriate to send two separate PRs so that each fix can be reviewed, refined, and merged independently. But if you send PRs using the master branch only, both fixes (and any other change you do in the master branch) will appear in the PRs you create from it.
To create another PR while the current PR is still under review, create a new branch (remember to switch back to the master branch first), add your new proposed change in that branch, and create a new PR following the steps given above.
It is possible to create PRs within the same repo e.g., you can create a PR from branch feature-x to the master branch, within the same repo. Doing so will allow the code to be reviewed by other developers (using PR review mechanism) before it is merged.
Resources
- Merge the PR using GitHub. Note how to merge PRs:
Textbook Git & GitHub → Merging PRs
Let's look at the steps involved in merging a PR, assuming the PR has been reviewed, refined, and approved for merging already.
Preparation: If you would like to try merging a PR yourself, you can create a dummy PR in the following manner.
- Fork any repo (e.g., samplerepo-pr-practice).
- Clone in to your computer.
- Create a new branch e.g., (
feature1) and add some commits to it. - Push the new branch to the fork.
- Create a PR from that branch to the
masterbranch in your fork. Yes, it is possible to create a PR within the same repo.
1. Locate the PR to be merged in your repo's GitHub page.
2. Click on the Conversation tab and scroll to the bottom. You'll see a panel containing the PR status summary.
3. If the PR is not merge-able in the current state, the Merge pull request will not be green. Here are the possible reasons and remedies:
- Problem: The PR code is out-of-date, indicated by the message This branch is out-of-date with the base branch. That means the repo's
masterbranch has been updated since the PR code was last updated.- If the PR author has allowed you to update the PR and you have sufficient permissions, GitHub will allow you to update the PR simply by clicking the Update branch on the right side of the 'out-of-date' error message. If that option is not available, post a message in the PR requesting the PR author to update the PR.
- Problem: There are merge conflicts, indicated by the message This branch has conflicts that must be resolved. That means the repo's
masterbranch has been updated since the PR code was last updated, in a way that the PR code conflicts with the currentmasterbranch. Those conflicts must be resolved before the PR can be merged.- If the conflicts are simple, GitHub might allow you to resolve them using the Web interface.
- If that option is not available, post a message in the PR requesting the PR author to update the PR.
Tools → Git and GitHub →
Merge conflicts happen when you try to combine two incompatible versions (e.g., merging a branch to another but each branch changed the same part of the code in a different way).
Here are the steps to simulate a merge conflict and use it to learn how to resolve merge conflicts.
0. Create an empty repo or clone an existing repo, to be used for this activity.
1. Start a branch named fix1 in the repo. Create a commit that adds a line with some text to one of the files.
2. Switch back to master branch. Create a commit with a conflicting change i.e. it adds a line with some different text in the exact location the previous line was added.
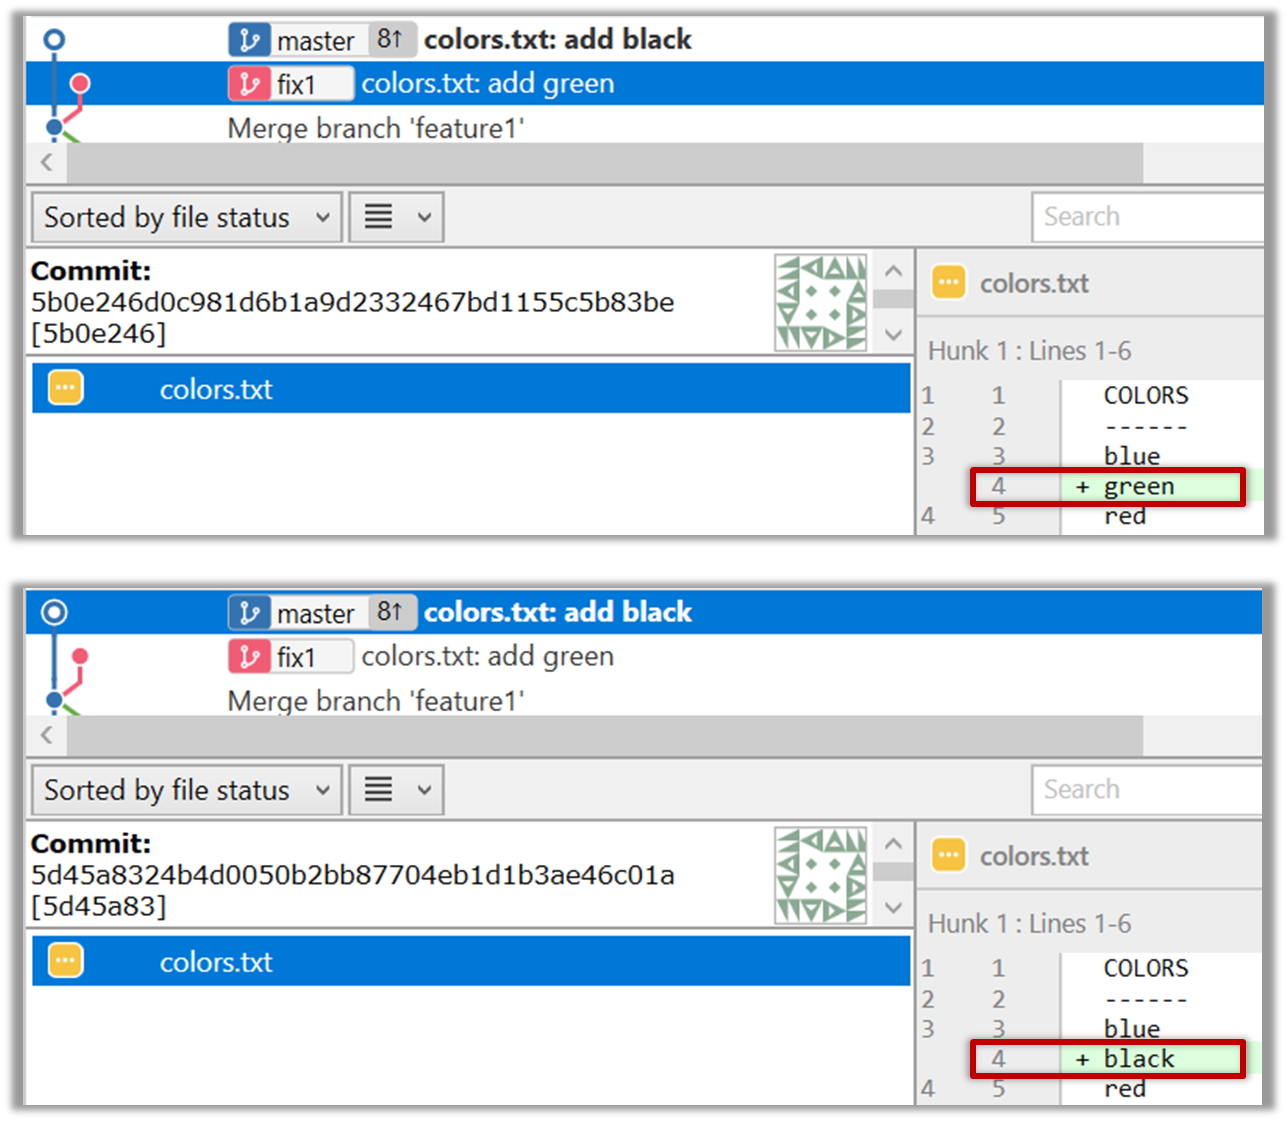
3. Try to merge the fix1 branch onto the master branch. Git will pause mid-way during the merge and report a merge conflict. If you open the conflicted file, you will see something like this:
COLORS
------
blue
<<<<<< HEAD
black
=======
green
>>>>>> fix1
red
white
4. Observe how the conflicted part is marked between a line starting with <<<<<< and a line starting with >>>>>>, separated by another line starting with =======.
Highlighted below is the conflicting part that is coming from the master branch:
blue
<<<<<< HEAD
black
=======
green
>>>>>> fix1
red
This is the conflicting part that is coming from the fix1 branch:
blue
<<<<<< HEAD
black
=======
green
>>>>>> fix1
red
5. Resolve the conflict by editing the file. Let us assume you want to keep both lines in the merged version. You can modify the file to be like this:
COLORS
------
blue
black
green
red
white
6. Stage the changes, and commit.
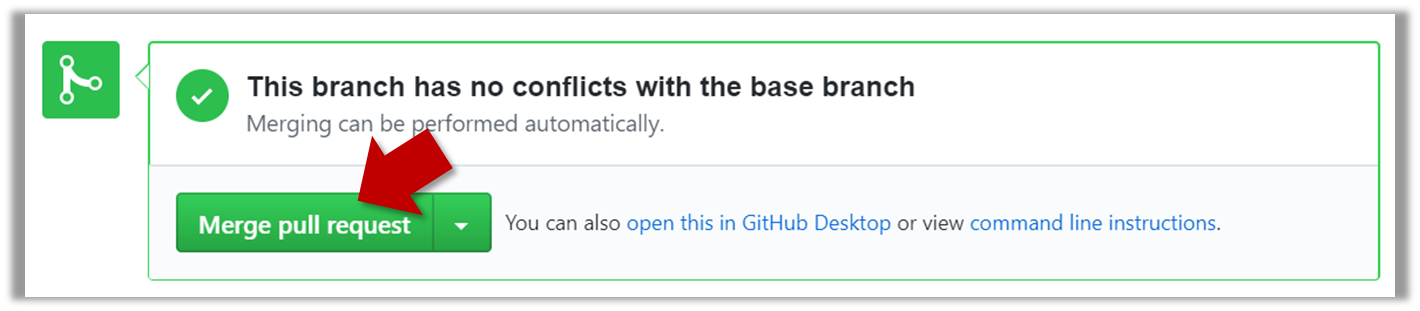
3. Merge the PR by clicking on the Merge pull request button, followed by the Confirm merge button. You should see a Pull request successfully merged and closed message after the PR is merged.
- You can choose between three merging options by clicking on the down-arrow in the Merge pull request button. If you are new to Git and GitHub, the
Create merge commitoptions are recommended.
Next, sync your local repos (and forks). Merging a PR simply merges the code in the upstream remote repository in which it was merged. The PR author (and other members of the repo) needs to pull the merged code from the upstream repo to their local repos and push the new code to their respective forks to sync the fork with the upstream repo.
- Pull the
masterbranch from the fork to your local repo.
Level-6: Delete Level 6. Delete
Add support for deleting tasks from the list.
Example:
list
    ____________________________________________________________
     Here are the tasks in your list:
     1.[T][✓] read book
     2.[D][✓] return book (by: June 6th)
     3.[E][✗] project meeting (at: Aug 6th 2-4pm)
     4.[T][✓] join sports club
     5.[T][✗] borrow book
    ____________________________________________________________

delete 3
    ____________________________________________________________
     Noted. I've removed this task:
       [E][✗] project meeting (at: Aug 6th 2-4pm)
     Now you have 4 tasks in the list.
    ____________________________________________________________
2 Add Increments as parallel branches: Level-7, A-JavaDoc
- Do Level 7 in a branch named
branch-Level-7. Without merging that branch, go back to themasterbranch and implement the other increment in a separate branch named similar to the first (i.e.,branch-{increment ID}). Now, go back to themasterbranch and merge the two branches one after the other. As before, tag the commit (in themasterbranch, after merging) that achieves the respective deliverable, and push to your fork.
Remember to push the branches to your fork so that the bot can detect them.
Only merged branches are detected by the script. After merging a branchb1to themasterbranch, you need to push both themasterand theb1branches to the fork. Pushing themasterbranch does not automatically take theb1branch along with it just because it is already merged to themasterbranch.
Advanced git users: do not delete the branch after merging.
Merge without a fast-forward so that git creates a separate commit for the merge.
Level-7: Save Level 7. Save
Save the tasks in the hard disk automatically whenever the task list changes. Load the data from the hard disk when Duke starts up. You may hard-code the file name and location e.g., [project_root]/data/duke.txt
The format of the file is up to you. Example:
T | 1 | read book
D | 0 | return book | June 6th
E | 0 | project meeting | Aug 6th 2-4pm
T | 1 | join sports club
If you use file paths in your code,
- remember to use relative paths rather than absolute paths such as
C:\data. If not, your app can cause unpredictable results when used in another computer. - remember to specify file paths in an OS-independent way. If not, your app might not work when used on a different OS.
Your code must i.e., if the file is missing, your code must creat ithandle the case where the data file doesn't exist at the start. Reason: when someone else takes your Duke and runs it for the first time, the required file might not exist in their computer. Similarly, if you expect the data file to be in as specific folder (e.g., ./data/), you must also handle the folder-does-not-exist-yet case.
3 Add Increment: A-Jar
- In case this increment does not require any code changes, you may tag the commit at which this was achieved as
A-Jar(even if that commit has another tag already). - Upload the jar file to your fork as explained in the panel below.
A-Jar: Create a JAR File Package the app as an executable JAR file so that it can be distributed easily.
You can assume the user will run the jar file in the following way only:
- Copy the jar file into an empty folder
- Open a command window in that folder
- Run the command
java -jar {filename}.jare.g.,java -jar Duke.jar(i.e., run the command in the same folder as the jar file)
Refer to the tutorial Working with JAR files @SE-EDU/guides to find how to create JAR files.
Do not commit the JAR file created. Instead, you can make the JAR file available in the following manner.
- Go to your fork on GitHub and create a new release.
- In the page where you fill the details of the release,
- give an appropriate version number e.g.,
v0.1 - attach the JAR file where it says
Attach binaries by dropping them ....
- give an appropriate version number e.g.,